Printing for Staff

Overview

The Staff Managed Print Service (MPS) provides A3 & A4, black & white and colour printing from any staff allocated SOE Mac or PC.

Staff MPS Printer Maintenance & General Advice

  1. Staff printers have automatic power-saving functions. Turning off the power may disrupt the proactive monitoring and automatic re-stocking of consumables.

  2. If a printer needs to be reallocated, the IT Service Centre needs to be contacted. Reallocating a printer changes the delivery details of consumables. Location data needs to be updated so as not to disrupt resupply services.

  3. Toner delivery should only be used in the designated printer, the low toner alert system of both printers will be affected otherwise.
Self Help Guides


Note: The following steps are for use on a Windows 10 SOE PC. You should be familiar with the print queue name and whether the printer you're connecting to is a Lexmark printer or a Fuji Xerox printer before proceeding. If you are using an older version of windows, please navigate to the 'Still Need Help?' section at the bottom of the page. Here you'll be able to log a ticket with the Service Desk to get further help.

Adding A Printer

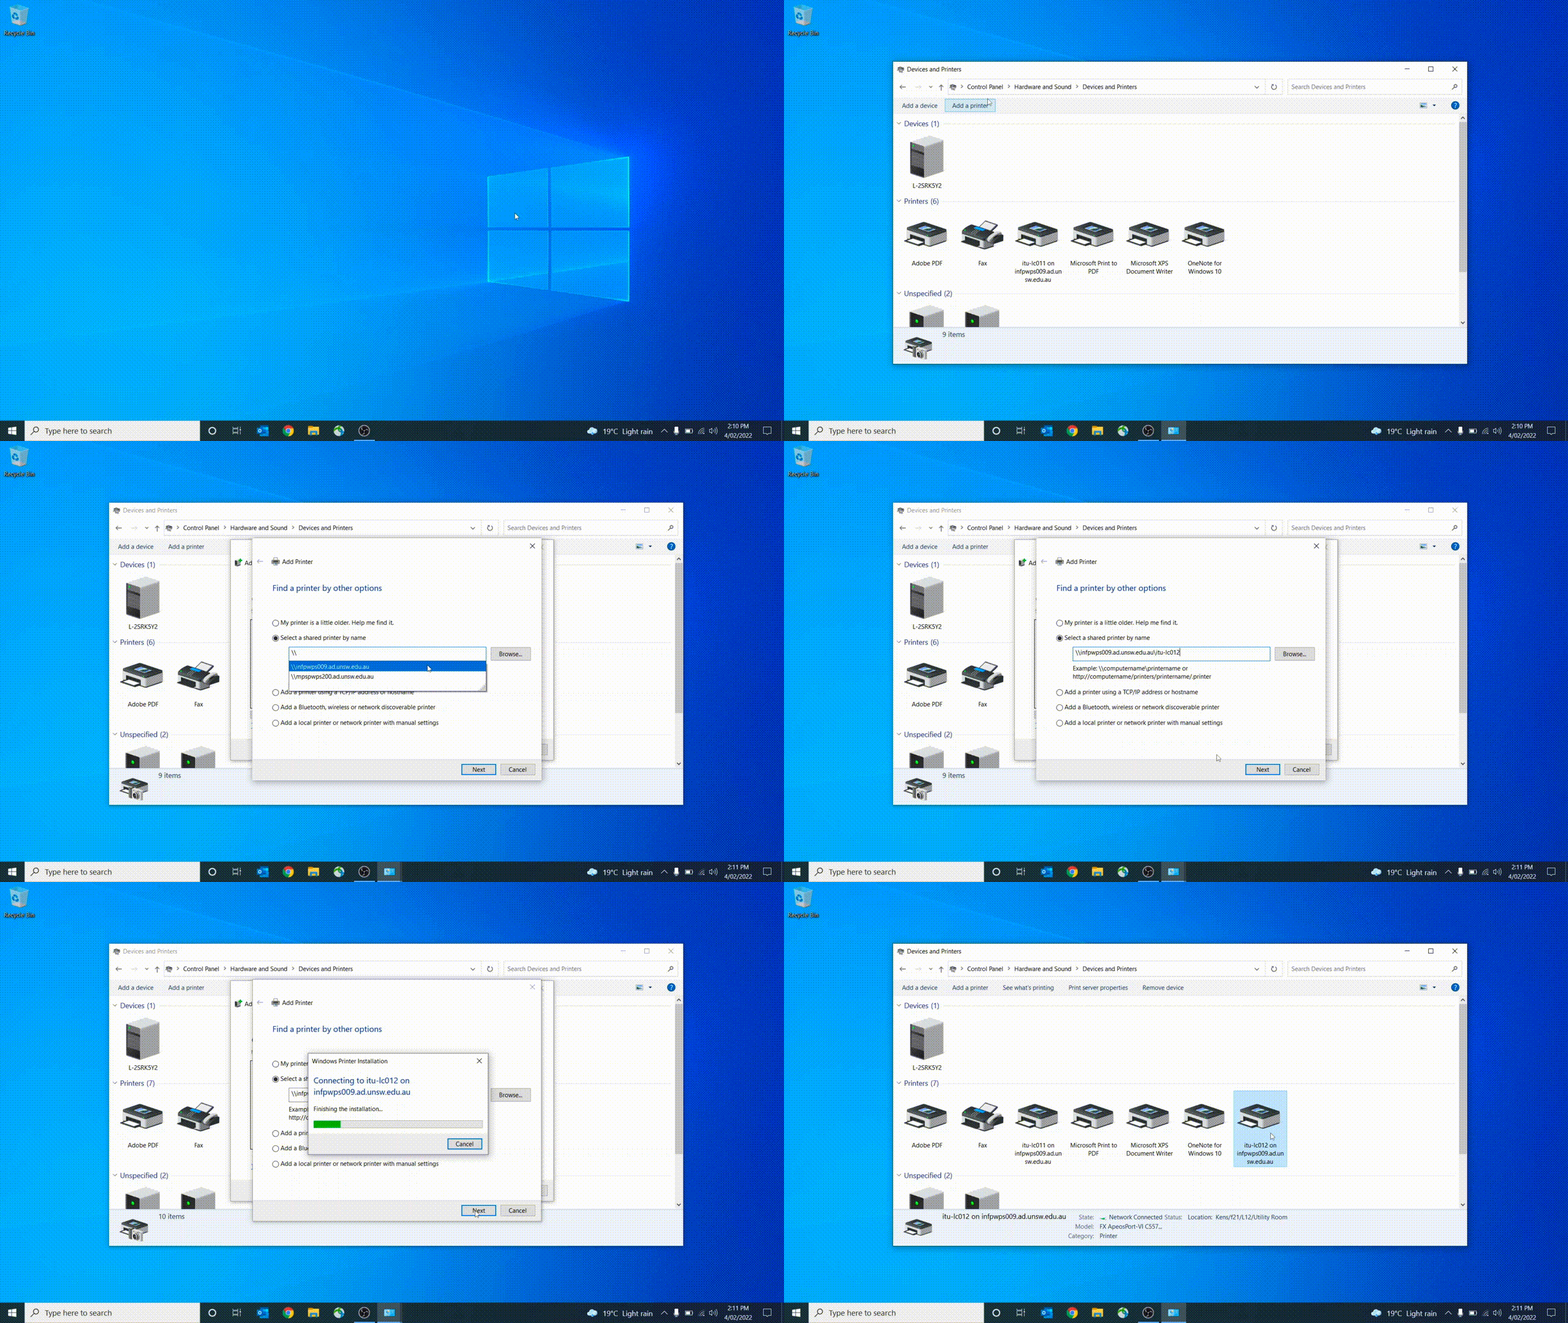
  1. Navigate to “Control Panel” on your PC

  2. From the Control Panel, navigate to “View devices and printers” under “Hardware and Sound”. From the top of this window select “Add a printer

  3. From the “Add a device” window click on the text “The printer that I want isn’t listed

  4. From the “Add Printer” window select “ Select a shared printer by name"

  5. If you're connecting to a Lexmark printer, please type the following in the blank field followed by the print queue name; \\mpspwps200.ad.unsw.edu.au\print queue name (\\mpspwps200.ad.unsw.edu.au\ITU-LC011)

  6. Or, if you're connecting to a Fuji Xerox printer, please type the following in the blank field followed by the print queue name; \\infpwps009.ad.unsw.edu.au\print queue name

  7. Click "Next". You then may be prompted with "Do you want to allow this app to make changes to your device?", please select "Yes" otherwise, the printer will continue to install. Follow the prompts to complete the installation.

Note: If you are not sure of the printer’s name or want help finding this out, please navigate to the “Finding A Printers Name” section of the page.

Below is a short example of this process for you to follow along with.

Printing for Staff PC


Note: The following steps are for use on a UNSW SOE Mac. The process involves the use of the UNSW Self Service App, installed on all UNSW Mac’s. If Self Service is not installed or you are not sure if you have a SOE Mac, please navigate to the 'Still Need Help?' section at the bottom of the page. Here you'll be able to log a ticket with the Service Desk to get further help.

Adding A Printer

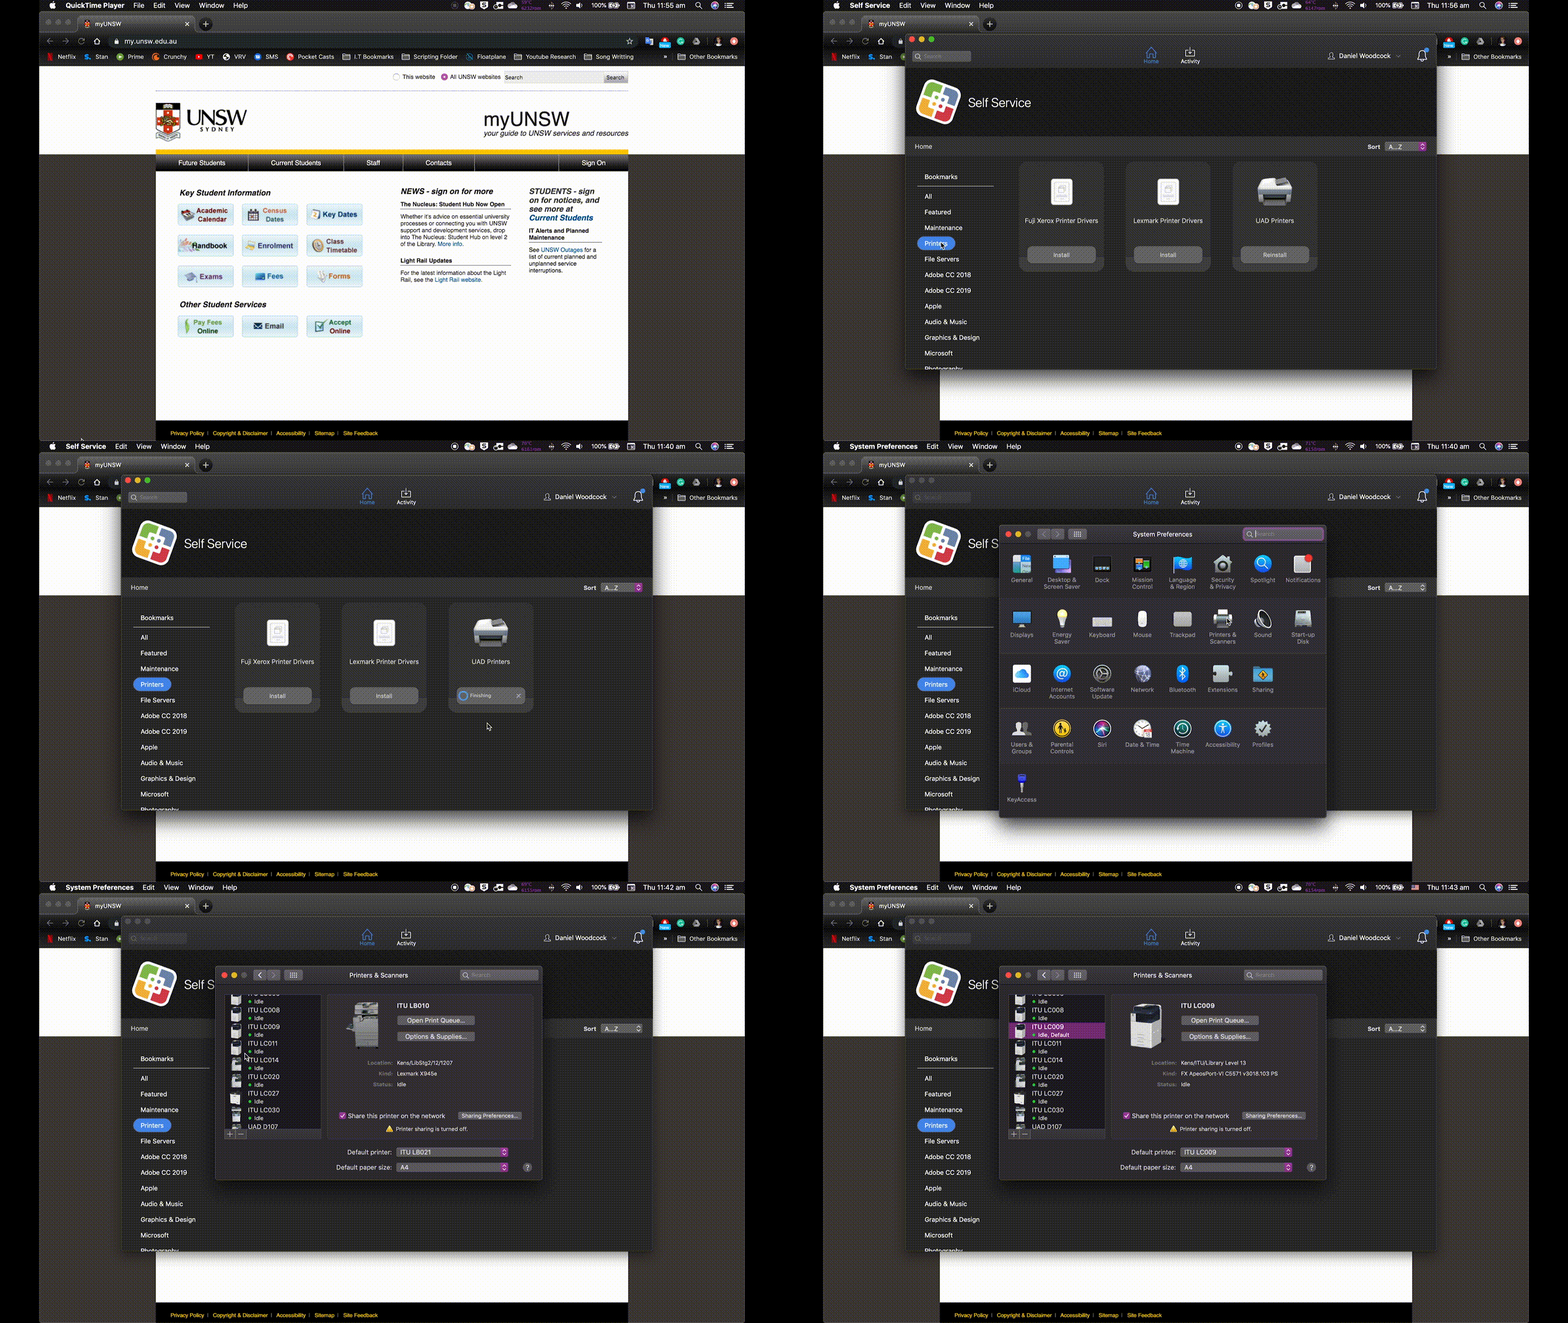
  1. Navigate to the “Self Service” App from either your Dock or the “Applications” folder

  2. In the “Self Service” window, click on “Printers” from Bookmarks down the left hand side of the app

  3. From here click on “Install” or “Reinstall” associated with the printer group best matching your location or department

Note: Depending on your role, you may have a dozen different printer groups listed here. It does not harm your system to select several different printer installations from here.

  1. Once you see the install is “Done” navigate to “System Preferences” from the Apple logo in the top left corner of your display.

  2. From the “System Preferences” window select “Printers”

  3. From the list of newly added printers, confirm if the name of the printer your wish to access is present

Note: If the printer you wish to added is not listed, go back to step 3 and try installing another printer group. If there are no more groups to be added, please navigate to the 'Still Need Help?' section at the bottom of the page. Here you'll be able to log a ticket with the Service Desk to get further help.

Note: If you are not sure of the printer’s name or want help finding this out, please navigate to the “Finding A Printers Name” section of this page.

  1. From the printer list you can right or secondary click on your desired printer. From this menu you will be able to set the newly added printer as your default printer.

Below is a short example of this process for you to follow along with.

Printing for Staff Mac

For security and cost concerns, we do not support the self adding of staff printers to Non-SOE/ Personal PC's & Mac's.

In order to gain access to printing for these devices, a member of UNSW IT will need to add a staff printer to your system via remote support tools. In order to facilitate this, a request will need to be raised to the UNSW Digital support team. This will need to be done by your manager/ supervisor via one of the following methods:

  • Call the IT Service Centre on 02 9385 1333.
  • Directly raise a request with the Digital support team at the following link: Digital Support Request

Regardless of the method, we will need to confirm the following information:

- Name and ZID of the staff member whose system we will be adding a printer too.

- Confirmation of an ongoing staff relationship with UNSW. Currently, we will not support the adding of staff printers to short term contractors or casuals. UNSW IT then needs confirmation that a staff member has a fixed term or ongoing employment status.

- The PC or Mac used is the primary system for work at UNSW.

In order for a member of our team to access your system to add a printer, we will need the application Teamviewer on the system. Following is a link to the UNSW Quick Support version of Teamviewer: TeamViewer QS. This version of the application does not need to be installed and is directly linked to UNSW.


Depending on the printer’s location, the name of the printer will be in some way displayed on the printer. The printer name will contain a faculty/divisional definer. This will then be followed by a hyphen, then 2 letters and 3 numbers. Below are some examples of printer names found around UNSW:

  • UAD-LC009

  • ASB-LB001

  • FAS-LC010

  • LAW-LB002

  • FBE-LC090

If you cannot find anything matching the above format on the printer, please navigate to the 'Still Need Help?' section at the bottom of the page. Here you'll be able to log a ticket with the Service Desk to get further help. They can assist you in finding the printers name and/or adding the printer to your system.

Note: At UNSW, for the most part you cannot scan directly to a computer. Scanning is achieved by using one of the staff MPS printers to send yourself an email containing the digitised copy.

  1. Access the touch screen on the Printer

  2. Press “Scan To Email

  3. Enter in the email address you wish to send the document to

  4. Place the document face down on the scanner glass (top left corner - portrait orientation) or face up into the document feeder (portrait  orientation) if scanning individual A4 sheets"

  5. Press Start or the Green button

The press Send on the screen

How do I purchase a printer?

Log a service desk request at the bottom of the page or call the IT Service Centre on 51333.

All printer, multifunction device and photocopier purchases must now go through the IT Manage Print Service.

Right-Fit Process & Printer Acquisition

An integral facet of implementing a Managed Print Service (MPS) at UNSW is the completion of  a Right-Fit analysis for each Faculty and Business unit.

The Right-Fit process will involve the collection and analysis of data, including: page count data; existing printer device data, and end user requirements. The output of this analysis is a documented ideal future state of fleet architecture. Managed Fleet Implementation will follow on from a Right-Fit Analysis. The Right-Fit analysis and Managed Fleet Implementation, will take approximately 2-4 weeks per installation/ device.

There is a relationship between new printer acquisition and the implementation of an MPS solution. Due to this, printer acquisition is limited when an MPS solution has not been actioned or requested.

A new Fuji printer acquisition should only occur in cases where there is a replacement required. The case for a replacement can be made when:

  • A device is “end of life”

  • A device is “end of lease” (EOL)

  • A High priority new order is required (such as a VIP raised request)


Note: please click on the links for further details of the particular printer you wish to view.

Colour A4 - A3 Multifunction Device
ApeosPort C7070 70ppm
ApeosPort C5570 55ppm
ApeosPort C3570 35ppm
Colour A4 Multifunction Device
ApeosPort C3321 35ppm
Black & White A4 - A3 Multifunction Device
ApeosPort-V B7080 70ppm
ApeosPort C5570 55ppm
Black & White A4 Multifunction Device

ApeosPort C4021 45ppm


If a printer is no longer needed in a location, the MPS team will need to be made aware of this so they can assist in the move process. In order to do this, you will need to raise a ticket to them via the IT Service Desk.

This can be done by Clicking here to raise a ticket.

Troubleshooting Guides

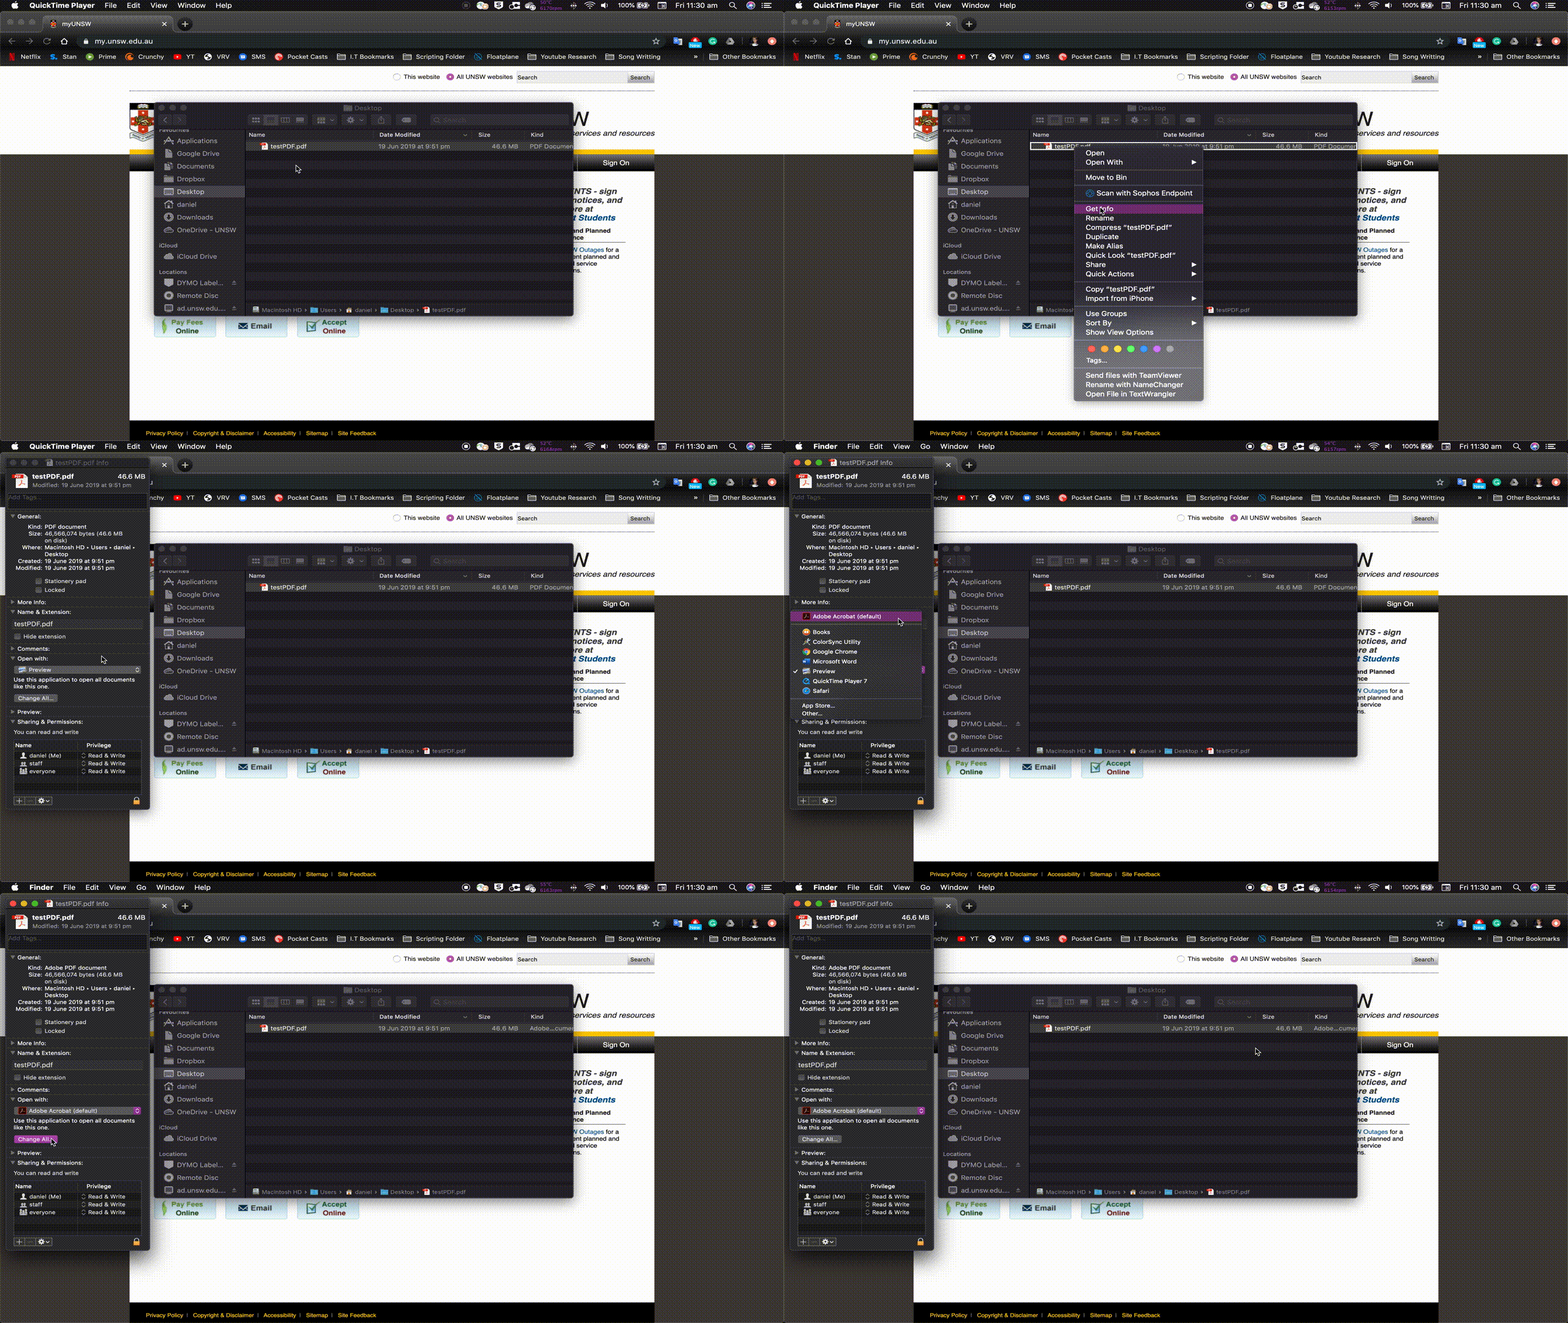
By default, the Mac will choose Apple’s “Preview” App to open PDF files. This is the App that is managing the print job and causing issues with our printing systems. All UNSW Macs have access to Adobes Acrobat DC. This app needs to be used when printing a PDF with our staff printers.

To change the default app that PDF’s open in please do the following:

  1. Navigate to a PDF file on your Mac. This can be any PDF file

  2. Right/ Secondary click on the file

  3. From the pop-up menu click on “Get Info

  4. From the “Open with” section of the file info window, select the drop-down menu with “Preview” listed

  5. From within the drop-down menu select “Adobe Acrobat

Note: If “Adobe Acrobat” is not listed here, then the App is not installed on your system. For further help getting access to Acrobat on your Mac, please navigate to the 'Still Need Help?' section at the bottom of the page. Here you'll be able to log a ticket with the Service Desk to get further help.

  1. Once Acrobat has been selected click on the “Change All…” button below

  2. From this point onwards, all PDF files will open with Acrobat. This will prevent issues caused by “Preview” when printing in the future.

Below is a short example of this process for you to follow along with.

Mac PDF Print Jobs

If print jobs are consistently failing to complete, the MPS team will need to investigate the exact cause of the issue. In order to do this, you will need to raise a ticket to them via the IT Service Desk.

This can be done by Clicking here to raise a ticket.

If a printer is low or out of consumables like paper and toner, the MPS team will need to investigate the exact cause of the issue. In order to do this, you will need to raise a ticket to them via the IT Service Desk.

This can be done by Clicking here to raise a ticket. 

If you have noticed that a printer is consistently out of any consumable, please let the MPS team know. This can be indicative of the printer’s details changing (like a move in location) without MPS being made aware of it. Exact details on printers need to be maintained, as all consumables are automatically ordered by a printer when supplies are low. The consumables once an automatic order is made will be delivered to the printer directly and installed. If details on a printer are wrong, it will miss scheduled resupply efforts.

Feedback